这里通过一个网页开关灯的例子来演示browser action,除了browser action之外,还会涉及到其他很多的chrome api或者manifest.json配置项。
这个文件包含的文件如下:
background.html
背景页,一个单独的长时间运行的脚本,是一个运行在扩展程序中的html页面。在应用的整个生命周期都存在,在同一个时间只有一个实例处于活动状态。
background.js
背景页的JS,一般不需要上面的background.html也可以,manifest.json中按照如下配置就可以了:
1
2
3
| "background": {
"scripts": ["background.js"]
}
|
func.js
一个需要注入到页面中的 content script
icon.png
应用的图标 19px * 19px
jquery-2.0.2.js
需要注入页面中使用的jquery库
manifest.json
应用的配置文件
popup.html
点击浏览器工具栏时,应用的弹窗页面
popup.js
弹窗页面对应的JS文件,在popup.html中引入。
下面就逐个文件说明:
1
2
3
4
5
6
7
8
9
10
11
12
13
14
15
16
17
18
19
20
21
22
23
24
25
26
27
28
| manifest.json
{
"manifest_version": 2,
"name": "pv show",
"description": "__MSG_ext_desc__",
"version": "2",
"default_locale": "en",
"icons": {
"48": "images/icon_16.png",
"48": "images/icon.png",
"128": "images/icon_128.png"
},
"permissions": [
"tabs",
"http://*/*",
"https://*/*",
"notifications"
],
"browser_action": {
"default_icon": "images/icon.png",
"default_popup": "options.html",
"default_title": "网页流量统计"
},
"background": {
          "scripts": ["background.js"]
      }
}
|
popup.html
1
2
3
4
5
6
7
8
9
10
11
12
13
14
15
16
17
18
19
20
21
22
23
24
25
26
27
28
29
30
31
32
33
34
35
36
| <!DOCTYPE html>
<html>
<head>
<meta http-equiv="Content-Type" content="text/html; charset=utf-8" />
<title>开关灯</title>
<style>
div{
width:100px;
height:20px;
line-height:20px;
text-align:center;
font-family: sans-serif;
font-size:0.8em;
background:#F3F3F3;
margin-bottom:4px;
cursor:pointer;
}
div:hover{
background:#CCCCCC;
}
.day{
background:#000;
}
.night{
background:#FFF;
}
</style>
<!\-\- 引入JS文件,这里引入的文件只能在popup.html页面中使用,不能再web页面中使用(页面中的为content script) -->
<script src="popup.js"></script>
<script src="jquery-2.0.2.min.js"></script>
</head>
<body>
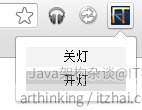
<div id="off">关灯</div>
<div id="on">开灯</div>
</body>
</html>
|
popup.js
1
2
3
4
5
6
7
8
9
10
11
12
13
14
15
16
17
18
19
20
21
22
23
24
|
document.addEventListener('DOMContentLoaded', function(){
var divs = document.querySelectorAll('div');
var obj = {"name":"root", "password":"123"};
for(var i=0; i<divs.length; i++){
divs[i].addEventListener('click', function(e){
chrome.tabs.executeScript(null,
{code:"switchLight('"\+ e.target.id +"');", allFrames: true});
});
}
});
|
func.js
1
2
3
4
5
6
7
8
9
10
|
function switchLight(lightAction){
console.log(lightAction);
if(lightAction == 'off'){
document.body.style.backgroundColor='#000';
} else {
document.body.style.backgroundColor='#fff';
}
}
|
background.html
背景页,应用的整个生命周期都存在,这个页面只是简单的引用了background.js文件,不用也可以,见上面的说明。
1
2
3
4
5
6
7
| <html>
<head>
<script src="background.js"></script>
</head>
<body>
</body>
</html>
|
bakcground.js
1
2
3
4
5
6
7
8
9
10
11
12
13
14
15
16
17
18
19
20
21
22
23
24
25
26
27
28
29
30
31
32
|
chrome.tabs.onUpdated.addListener(function(tabId, changeInfo, tab) {
initialize(tabId);
});
chrome.tabs.onSelectionChanged.addListener(function(tabId, selectInfo) {
initialize(tabId);
});
function initialize(tabId){
chrome.tabs.executeScript(tabId, {file: "func.js", allFrames: true});
chrome.tabs.executeScript(tabId, {file: "jquery-2.0.2.js", allFrames: true});
}
chrome.extension.onRequest.addListener(
function(request, sender, sendResponse) {
chrome.tabs.executeScript(null, {code: "switchLight("\+ request +");", allFrames: true});
});
|
源代码稍后补充…