本文重点介绍各种阻塞队列的实现、对比和使用场景。阅读完本文,你将对各种阻塞队列的实现原理都有一定的了解,以及了解他们的使用场景。
1、阻塞队列 BlockingQueue
1.1、BlockingQueue的基本原理
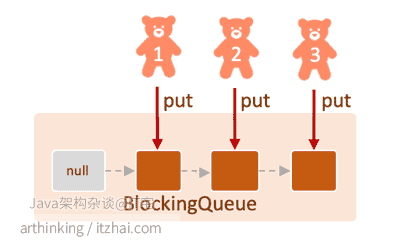
我们先来解释一下阻塞队列:
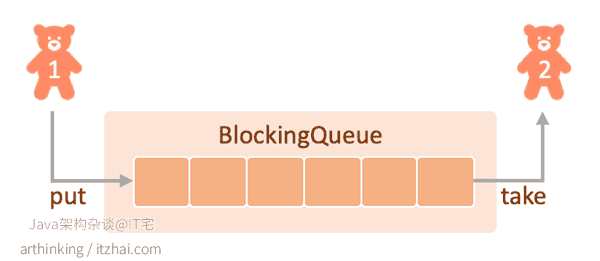
如上图
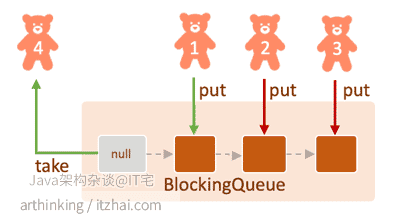
- 生产线程1往阻塞队列里面添加新的数据,当阻塞队列满的时候(针对有界队列),生产线程1将会处于阻塞状态,直到消费线程2从队列中取走一个数据;
- 消费线程2从阻塞队列取数据,当阻塞队列空的时候,消费线程2将会处于阻塞状态,直到生产线程把一个数据放进去。
阻塞队列的基本原理就这样,至于队列是用什么数据结构进行存储的,这里并没有规定,所以后面我们可以看到很多阻塞队列的实现。
阻塞队列的常用方法
我们查阅BlockingQueue总结了以下阻塞队列的方法:
| 如果队列满了(插入)或者空(移除)了 |
抛异常 |
阻塞 |
超时 |
立刻返回 |
| 插入 |
add(E e) |
put(E e) |
offer(E e, long timeout, TimeUnit unit) |
offer(E e) |
| 移除 |
remove(Object o) |
take() |
poll(long timeout, TimeUnit unit) |
|
注意:
根据remove(Object o)方法签名可知,这个方法可以移除队列的特定对象,但是这个方法效率并不高。因为需要遍历队列匹配到特定的对象之后,再进行移除。
以上支持阻塞和超时的方法都是能够响应中断的。
1.2、BlockingQueue的实现
作为一个五年级的小学生,到这里就开始听不懂了,暗中嘚瑟,还好学的没那么快。
下图展示了主要的BlockingQueue的实现类:
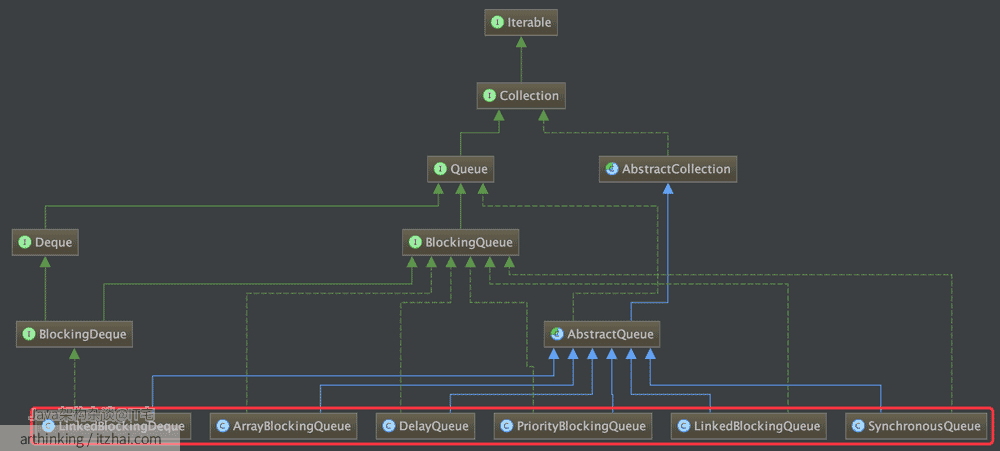
其实我们在前面的文章:ReentrantLock介绍与使用#2.4、条件变量 章节已经使用ReentrantLock的Condition实现了一个阻塞队列,底层是使用LinkedList进行存储的。
BlockingQueue底层也是基于AQS实现的,队列的阻塞使用ReentrantLock的Condition实现的。
下面我们来看看各个实现类的原理。以下分析我都会基于支持阻塞的put和take方法来分析。
2、ArrayBlockingQueue
相信经过上面各个同步类的分析,大家已经对AQS比较熟悉了,下面我将不再画具体的内部结构图了。
ArrayBlockingQueue使用的数据结构是数组:
Object[capacity]
容量大小有构造函数的capacity参数决定。
2.1、put方法
1
2
3
4
5
6
7
8
9
10
11
12
13
14
15
16
17
| public void put(E e) throws InterruptedException {
checkNotNull(e);
final ReentrantLock lock = this.lock;
lock.lockInterruptibly();
try {
while (count == items.length)
notFull.await();
enqueue(e);
} finally {
lock.unlock();
}
}
|
- 只有获取到了ReentrantLock锁之后,才可以操作队列;
- 队列满了会阻塞进入条件队列等待;
- 队列不满则添加数据,并且唤醒等待时间最长的取数线程。
2.2、take方法
如果队列空了,则进入条件队列进行等待。
1
2
3
4
5
6
7
8
9
10
11
12
13
14
15
16
| public E take() throws InterruptedException {
final ReentrantLock lock = this.lock;
lock.lockInterruptibly();
try {
while (count == 0)
notEmpty.await();
return dequeue();
} finally {
lock.unlock();
}
}
|
- 只有获取到了ReentrantLock锁之后,才可以操作队列;
- 队列空了会阻塞进入条件队列等待;
- 队列不满则取数据,并且唤醒等待时间最长的存数线程。
**注意:ArrayList中的数据取数和存数都是依次遍历一个一个取或者存,直到队尾之后,从头开始继续。**代码如下:
1
2
3
4
5
6
7
8
9
10
11
12
13
14
15
16
17
18
19
20
21
22
| private void enqueue(E x) {
final Object[] items = this.items;
items[putIndex] = x;
if (++putIndex == items.length)
putIndex = 0;
count++;
notEmpty.signal();
}
private E dequeue() {
final Object[] items = this.items;
@SuppressWarnings("unchecked")
E x = (E) items[takeIndex];
items[takeIndex] = null;
if (++takeIndex == items.length)
takeIndex = 0;
count--;
if (itrs != null)
itrs.elementDequeued();
notFull.signal();
return x;
}
|
如下图:
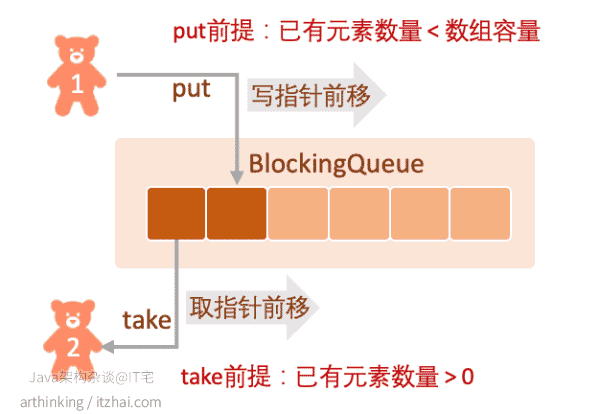
这里put和take使用了同一个ReentrantLock,不能并发执行。
有没有办法能够做到让put和take能够并发执行呢?接下来我们就来看看LinkedBlockingQueue。
3、LinkedBlockingQueue
LinkedBlockingQueue的put方法和take方法分别使用了不同的ReentrantLock,put和take可以并发执行,但是不能并发执行put或者take操作。
LinkedBlockingQueue底层使用的数据结构是单向链表:
transient Node head;
private transient Node last;
容量大小可以由构造函数的capacity设定,默认为:Integer.MAX_VALUE
3.1、put方法
1
2
3
4
5
6
7
8
9
10
11
12
13
14
15
16
17
18
19
20
21
22
23
24
25
26
27
28
29
| public void put(E e) throws InterruptedException {
if (e == null) throw new NullPointerException();
int c = -1;
Node<E> node = new Node<E>(e);
final ReentrantLock putLock = this.putLock;
final AtomicInteger count = this.count;
putLock.lockInterruptibly();
try {
while (count.get() == capacity) {
notFull.await();
}
enqueue(node);
c = count.getAndIncrement();
if (c + 1 < capacity)
notFull.signal();
} finally {
putLock.unlock();
}
if (c == 0)
signalNotEmpty();
}
|
3.2、take方法
1
2
3
4
5
6
7
8
9
10
11
12
13
14
15
16
17
18
19
20
21
22
23
24
25
26
27
28
| public E take() throws InterruptedException {
E x;
int c = -1;
final AtomicInteger count = this.count;
final ReentrantLock takeLock = this.takeLock;
takeLock.lockInterruptibly();
try {
while (count.get() == 0) {
notEmpty.await();
}
x = dequeue();
c = count.getAndDecrement();
if (c > 1)
notEmpty.signal();
} finally {
takeLock.unlock();
}
if (c == capacity)
signalNotFull();
return x;
}
|
take和put操作如下图所示:
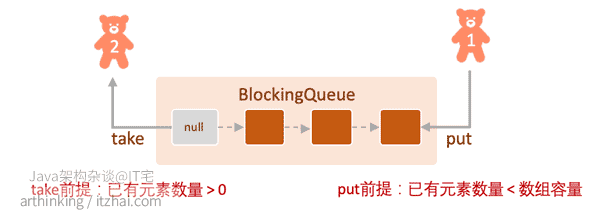
- 队列第一个节点为哑节点,占位用的;
- put操作一直往链表后面追加节点;
- take操作从链表头取节点;
ArrayBlockingQueue与LinkedBlockingQueue对比
| 队列 |
是否阻塞 |
是否有界 |
线程安全 |
适用场景 |
| ArrayBlockingQueue |
√ |
√ |
一把ReentrantLock锁 |
生产消费模型,平衡处理速度 |
| LinkedBlockingQueue |
√ |
可配置 |
两把ReentrantLock锁 |
生产消费模型,平衡处理速度 |
ArrayBlockingQueue:
- 数据结构:数组,存储空间预先分配,无需动态申请空间,使用过程中内存开销较小;
LinkedBlockingQueue:
- 数据结构:单项链表,存储空间动态申请,会增加JVM垃圾回收负担;
- 两把锁,并发性能较好;
- 可设置为无界,吞吐量比较大,但是不稳定,入队速度太快有可能导致内存溢出。
4、LinkedBlockingDeque
与LinkedBlockingQueue类似,只不过底层的数据结构是双向链表,并且增加了可以从队列两端插入和移除元素的方法,支持FIFO和FILO。相关方法定义:
- putFirst(E e)
- putLast(E e)
- E getFirst()
- E getLast()
- E takeFirst()
- E takeLast()
- …
LinkedBlockingQueue与LinkedBlockingDeque对比
LinkedBlockingQueue:
- FIFO;
- 读写分开两个ReentrantLock;
LinkedBlockingDeque:
- FIFO & FILO;
- 全局一把ReentrantLock;
5、PriorityBlockingQueue
是一个无界队列
存储结构:
private transient Object[] queue;
内部会构造为一颗平衡的二叉小顶堆,根据构造函数中传入的Comparator进行排序或者没有传的情况下使用自然的排序方法,数组的第一个元素为最小的元素。
全局一把ReentrantLock锁。
5.1、put方法
**无界队列,一定可以添加成功,无需阻塞。容量不够则扩容,put完会重新构建小顶堆。**关键代码如下:
1
2
3
4
5
6
7
8
9
10
11
12
13
14
15
16
17
18
19
20
21
22
23
24
25
26
27
28
| public boolean offer(E e) {
if (e == null)
throw new NullPointerException();
final ReentrantLock lock = this.lock;
lock.lock();
int n, cap;
Object[] array;
while ((n = size) >= (cap = (array = queue).length))
tryGrow(array, cap);
try {
Comparator<? super E> cmp = comparator;
if (cmp == null)
siftUpComparable(n, e, array);
else
siftUpUsingComparator(n, e, array, cmp);
size = n + 1;
notEmpty.signal();
} finally {
lock.unlock();
}
return true;
}
|
跟前面的各种阻塞队列实现思路基本一致,这里比较有意思的是数组的扩容和往小顶堆插入元素的处理逻辑,由于篇幅所限,这里不展开讲了,感兴趣的朋友可以前去了解下。
5.2、take方法
队列为空的时候进入条件等待,take完元素之后,立刻重新构建小顶堆。
1
2
3
4
5
6
7
8
9
10
11
12
13
14
15
| public E take() throws InterruptedException {
final ReentrantLock lock = this.lock;
lock.lockInterruptibly();
E result;
try {
while ( (result = dequeue()) == null)
notEmpty.await();
} finally {
lock.unlock();
}
return result;
}
|
这里比较有趣的是dequeue()方法,涉及到取最小元素,然后重新排序,由于篇幅所限,这里不展开讲了,感兴趣的朋友可以前去了解下。
6、SynchronousQueue
通过使用SynchronousQueue,我们可以在线程之间安全的传递变量,A线程把需要传递的变量放入SynchronousQueue,B线程读取。该队列特点如下:
- 容量永远为0;
- put操作阻塞,直到另一个线程取走了队列中的元素;
- take操作阻塞,直到另一个线程put一个元素到队列中;
- 任何线程只能取得其他线程put进去的元素。
与其他阻塞队列不同的是,SynchronousQueue不依赖与AQS实现,而是直接使用CAS操作实现的,这导致代码中有大量的判断是否数据被并发改写了,并做相应的处理。
我们不推荐使用的无界线程池Executors.newCachedThreadPool()底层就是用到了SynchronousQueue来实现的。
SynchronousQueue具有公平模式和非公平模式的区别,两者的实现不太一样,接下来就介绍一下。
6.1、公平模式
公平模式下,底层的数据结构是一个单向链表,对应实现类为:TransferQueue。
底层数据结构与LinkedBlockingQueue类似,只不过阻塞的条件不同:
- LinkedBlockingQueue在队列满的时候put线程会阻塞,在队列空的时候,take线程会阻塞;
- SynchronousQueue put进去的元素没有被take的时候,put线程阻塞,take线程获取不到元素的时候,take线程阻塞;
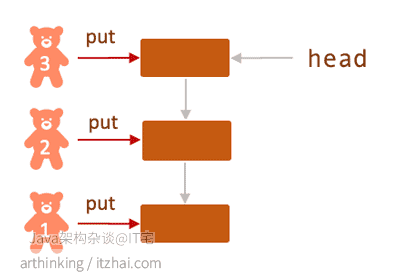
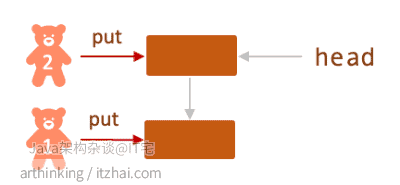
如下图,刚开始有三个线程执行了put操作,都阻塞等待了:
然后有一个新的线程4执行了take操作,这里是FIFO队列,匹配上了线程1,于是线程1取了线程1节点的数据,然后同时唤醒了线程1,头节点向前推进:
这种FIFO的模式真是公平的体现。
大致执行流程就是这样子,比使用了AQS的简单,取而代之的是使用CAS,通过大量的检验节点是否变更和处理,以达到更高put和take的性能,不过代码就自然会变得很复杂了,感兴趣的朋友可以前往查看源码,这里就不做详细的解读了。
6.2、非公平模式
非公平模式,底层的数据结构是一个栈。代码也是比较复杂的,这里我直接用图来描述下其执行原理。
如下图,线程1、线程2、线程3依次执行put操作,入栈情况如下图,结果三个线程都阻塞了:
这个时候线程4执行take操作,会入栈,与栈顶的栈帧进行匹配:
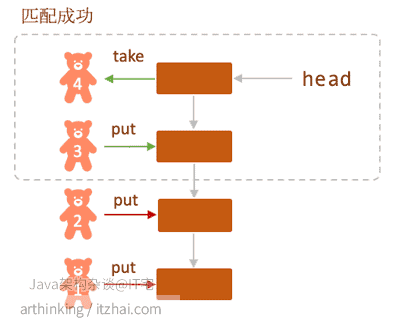
匹配成功之后,唤醒匹配上的线程3,然后从栈中移除线程3和线程4
可以发现非公平模式下是LIFO的队列。
7、DelayQueue
延迟队列,提供给了在指定时间内才能获取队列元素的功能。
底层是通过PriorityQueue实现的:
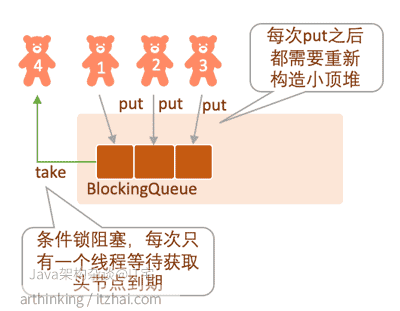
- put元素,触发Delayed接口的compareTo方法重新排序PriorityQueue小顶堆,让最小的元素(最快到期)排在最前面;一定会put成功,容量不够则扩容;
- take元素,判断第一个元素是否到期,到期了则把原始poll出来(同时会重新构造小顶堆),否则会执行awaitNanos(delay),等待头节点元素到期之后,再重新获取元素。
8、各种阻塞锁对比
| 阻塞锁 |
数据结构 |
是否有界 |
线程安全 |
适用场景 |
ArrayBlockingQueue |
数组 |
有界 |
一把ReentrantLock锁控制put和take。 |
生产消费模型,平衡处理速度 |
LinkedBlockingQueue |
单向链表 |
可配置 |
两把ReentrantLock锁,put和take可以并发执行。 |
生产消费模型,平衡处理速度 |
LinkedBlockingDeque |
双向链表 |
可配置 |
一把ReentrantLock锁控制put和take。 |
生产消费模型,平衡处理速度 |
优先级队列 PriorityBlockingQueue |
二叉小顶堆 |
无界,会自动扩容 |
一把ReentrantLock锁控制put和take,队列为空的时候take进入条件等待; |
短信队列中的验证码短信优先发送 |
同步队列 SynchronousQueue |
单向链表或者栈 |
容量为1 |
CAS,put和take都会阻塞,直到配对成功为止; |
线程之间传递数据 |
延迟队列 DelayQueue |
PriorityQueue,二叉小顶堆 |
无界,会自动扩容 |
一把ReentrantLock锁控制put和take,一次只能一个线程take,其他线程进入条件等待; |
关闭超时空连接,任务超时处理… |
9、使用案例
9.1、案例一:生产者消费者
下面是一个使用案例,使用到了阻塞队列和CountDownLatch。这个程序模拟:
- 一个生产者线程,往阻塞队列中依次存入20条消息;
- 一个消费者线程,一直尝试从阻塞线程中取出消息进行消费。
您可以使用上一节中 4.2.1~4.2.4中的任何一个阻塞队列替换掉代码中的阻塞队列,尝试看看效果:
1
2
3
4
5
6
7
8
9
10
11
12
13
14
15
16
17
18
19
20
21
22
23
24
25
26
27
28
29
30
31
32
33
34
35
36
37
38
39
40
41
42
43
44
45
46
47
48
49
50
51
52
53
54
55
56
57
58
59
60
61
62
63
64
65
66
| public class BlockingQueueTest {
public static void main(String[] args) {
ExecutorService executor = Executors.newFixedThreadPool(2);
BlockingQueue<String> queue = new PriorityBlockingQueue<>();
executor.submit(new Producer(queue));
executor.submit(new Cunsumer(queue));
executor.shutdown();
}
}
class Producer implements Runnable{
private BlockingQueue<String> queue;
Producer(BlockingQueue<String> queue) {
this.queue = queue;
}
@Override
public void run() {
try {
for (int i = 0; i < 20; i++){
TimeUnit.MILLISECONDS.sleep(new Random().nextInt(1000));
String threadName = Thread.currentThread().getName();
String msg = threadName + " : " + (i + 1);
queue.put(msg);
System.out.println("producer: " + msg);
}
System.out.println("producer finished...");
} catch (InterruptedException e) {
e.printStackTrace();
}
}
}
class Cunsumer implements Runnable{
private BlockingQueue<String> queue;
Cunsumer(BlockingQueue<String> queue) {
this.queue = queue;
}
@Override
public void run() {
try {
while (true){
TimeUnit.MILLISECONDS.sleep(new Random().nextInt(5000));
String msg = queue.take();
System.out.println("consumer " + Thread.currentThread().getName() + ", msg : " + msg);
}
} catch (Exception e) {
e.printStackTrace();
}
}
}
|
9.2、案例二:优先级阻塞队列
下面是一个PriorityBlockingQueue的使用例子,可以发现每次put一个元素之后会自动排序,小顶堆第一个元素总是最小的那个,每次take出来的元素也是最小的,take出来之后也会再次自动排序:
1
2
3
4
5
6
7
8
9
10
11
12
13
14
15
16
17
18
19
20
21
22
23
24
25
26
27
28
29
30
31
32
33
34
35
36
37
38
39
40
41
42
43
44
| public class PriorityBlockingQueueTest {
public static void main(String[] args) throws InterruptedException {
PriorityBlockingQueue<UserInfo> queue = new PriorityBlockingQueue<>();
queue.put(new UserInfo(10, "User1"));
System.out.println("priorityBlockingQueue: " + queue);
queue.put(new UserInfo(5, "User2"));
System.out.println("priorityBlockingQueue: " + queue);
queue.put(new UserInfo(2,"User3"));
System.out.println("priorityBlockingQueue: " + queue);
queue.put(new UserInfo(4,"User4"));
System.out.println("priorityBlockingQueue: " + queue);
System.out.println("take data: " + queue.take());
System.out.println("priorityBlockingQueue: " + queue);
System.out.println("take data: " + queue.take());
System.out.println("priorityBlockingQueue: " + queue);
}
}
@Data
@NoArgsConstructor
@AllArgsConstructor
class UserInfo implements Comparable<UserInfo>{
private int id;
private String name;
@Override
public String toString() {
return this.id + "";
}
@Override
public int compareTo(UserInfo person) {
return this.id > person.getId() ? 1 : ( this.id < person.getId() ? -1 :0);
}
}
|
输出结果:
1
2
3
4
5
6
7
8
| priorityBlockingQueue: [10]
priorityBlockingQueue: [5, 10]
priorityBlockingQueue: [2, 10, 5]
priorityBlockingQueue: [2, 4, 5, 10]
take data: 2
priorityBlockingQueue: [4, 10, 5]
take data: 4
priorityBlockingQueue: [5, 10]
|
9.3、案例三:SynchronousQueue的使用
下面使用SynchronousQueue的使用案例。大家可以替换成公平模式或者非公平模式,来查看程序输出结果,看看是FIFO还是LIFO:
1
2
3
4
5
6
7
8
9
10
11
12
13
14
15
16
17
18
19
20
21
22
23
24
25
26
27
28
29
30
31
32
33
34
35
36
37
38
| ExecutorService executor = Executors.newFixedThreadPool(10);
SynchronousQueue<Integer> queue = new SynchronousQueue<>(false);
Runnable producer = () -> {
Integer producedElement = ThreadLocalRandom
.current()
.nextInt();
try {
System.out.println(Thread.currentThread().getName() + " put " + producedElement);
queue.put(producedElement);
System.out.println(Thread.currentThread().getName() + " put finished");
} catch (InterruptedException ex) {
ex.printStackTrace();
}
};
Runnable consumer = () -> {
try {
TimeUnit.SECONDS.sleep(1);
Integer consumedElement = queue.take();
System.out.println(Thread.currentThread().getName() + " take " + consumedElement);
} catch (InterruptedException ex) {
ex.printStackTrace();
}
};
Thread.sleep(1000);
executor.execute(producer);
Thread.sleep(1000);
executor.execute(producer);
Thread.sleep(1000);
executor.execute(producer);
Thread.sleep(1000);
executor.execute(consumer);
executor.shutdown();
System.out.println(queue.size());
|
References
A Guide to Java SynchronousQueue


